We all know that Python is single-threaded and blocking, meaning only one thread runs the code, and the function blocks the thread until it finishes. However, there are tools and frameworks that solve this by offering async operations, so the thread doesn’t get blocked.
For example, FastAPI uses asyncio to make the framework asynchronous by default, allowing us to handle thousands of concurrent requests. But this is only suitable for I/O operations and not ideal for long-running tasks or heavy CPU computing, like generating PDFs or sending bulk emails. This is because the event loop gets blocked while executing these tasks, slowing everything down.
This is where Celery comes in. Celery allows us to offload long-running or CPU-intensive tasks to Celery workers, which run in the background independently of the main application.
In this article, we’ll learn what Celery is, get an overview of how it works, and see how to integrate Celery into our application. Additionally, we’ll explore how to use Flower to monitor our tasks.
Prerequisite
Before we begin, I’ll assume you have a basic understanding of Python and its packages, as well as a basic idea about FastAPI (since we’ll integrate it into a FastAPI application) or any other framework.
Celery
Why Celery?
But first, let’s understand why we need Celery. As explained earlier, due to Python’s blocking nature, running async operations can be difficult. While asyncio solves this problem, Python’s single-threaded nature means that if a long-running task is executed, it blocks the event loop and other requests.
With Celery, we can offload these long-running or CPU-intensive tasks to Celery, which manages them in the background without affecting the main application.
We can understand this better with a restaurant analogy. Imagine a restaurant without any waiters. When someone orders something, the chef takes the order and prepares it. If another order comes in, the chef can’t start it until the first one is finished. Now, if there is a waiter, the waiter takes all the orders, and the chef prepares them one by one, or multiple chefs can work on different orders based on the waiter’s instructions.
Similarly, in this scenario, the waiter is Celery. Celery manages all the tasks and executes them with workers, who are like the chefs.
What is Celery?
First, let me clarify that this Celery is not the vegetable we add to our food. It’s different, even though it looks similar in color 😉.
In simple terms, Celery is a Python tool that lets you perform tasks in the background and asynchronously, outside your main application.
According to the official definition, Celery is a distributed task queue that allows us to run background jobs outside the main application. It’s distributed because it’s not limited to one machine or one process, which helps us scale horizontally by running multiple Celery workers across different servers.
Celery also supports real-time processing, like sending notifications or emails. It supports task scheduling for running periodic tasks as well. (By the way, please check the official docs; they are very well written.)
How Celery Works?
Now that we know what Celery is, let’s explore how it works within an application. We’ll use FastAPI throughout the article, but the concepts are similar for other frameworks too.
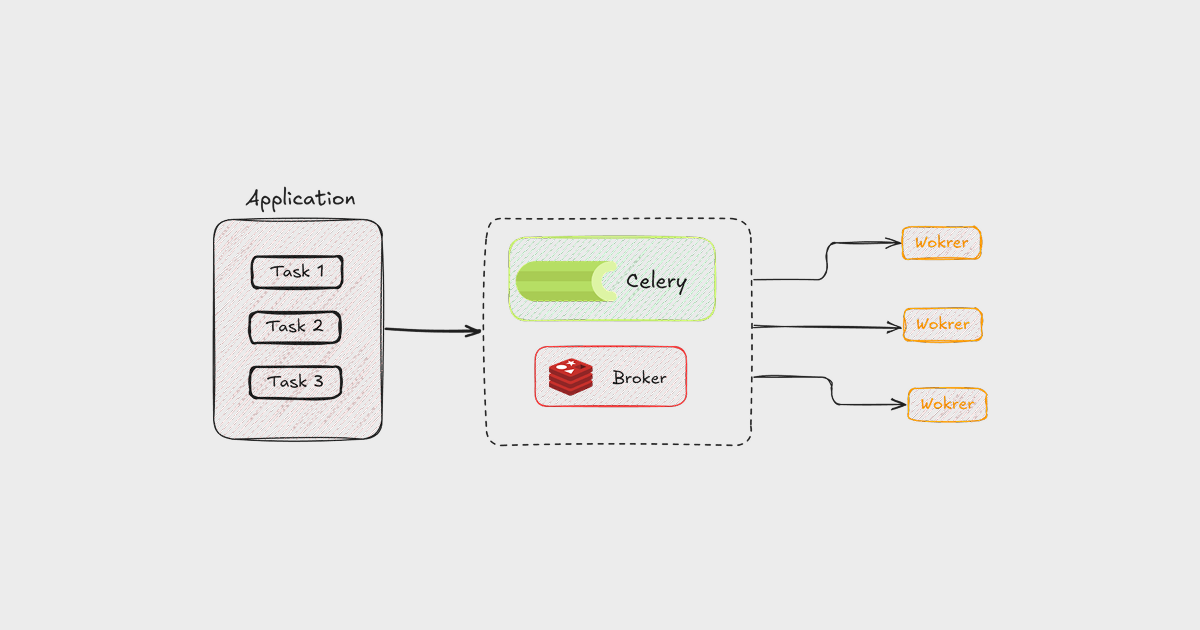
Let’s understand how tasks are executed within an application using Celery. We’ll take an example of a request that involves heavy CPU tasks and is long-running. Here’s how it will work:
-
When a heavy task is requested, FastAPI offloads the task to Celery via message queues.
-
This message queue is provided by a message broker like Redis or RabbitMQ. The queue temporarily stores all the tasks that are offloaded to Celery.
-
Celery runs in the background as an independent application. It creates workers that can execute these tasks, and the number of workers can be configured in the Celery configuration.
-
These Celery workers constantly watch the message queue for new tasks. When tasks appear in the queue, a worker picks a task, executes it, and the process continues.
-
After a Celery worker executes tasks, it provides results that can be stored in the backend for inspecting the results and status of the execution.
-
In addition to handling results, Celery can manage retries for failed tasks, and we can schedule some tasks to execute at specific times.
-
In most cases, the number of tasks will be higher than the number of workers. In this case, active workers execute tasks by picking from the queues, while the rest of the tasks stay in the queue. Once a worker completes execution, it picks up the next task from the queue, and this process continues.
Here’s a flow diagram showing how it works within an application.

We can also easily understand this with the customer-waiter-chef analogy.
Here, the customer is the main application, the waiter is the message broker, and the chefs are the Celery workers. When the customer (FastAPI) wants something, they tell the waiter (Celery) what they need. The waiter writes it down it on a list (message broker) and gives it to the chef (Celery workers). If there are three chefs, each chef can make one dish at a time. All the customer’s orders are recorded on the waiter’s list (message broker). Once a chef finishes a dish, they move on to the next dish as listed by the waiter.
Now that we understand what Celery is and how it works, let’s implement it in a FastAPI project.
Integrating Celery
Before installing Celery, we need to set up a message broker and a backend to save the results, as their roles are crucial for Celery integration. Let’s briefly learn about them.
Message Broker:
The broker is the message queue system. It sits between the core application and the Celery workers. Think of it like the waiter’s list in the restaurant analogy above, connecting the customer and the chefs. The broker is where tasks are stored temporarily before being picked up by Celery workers for execution.
According to the documentation, Redis and RabbitMQ are two well-supported options for use as a message broker, while some others are experimental and lack full support. Check out the latest docs for more information.
In this article, we’ll use Redis as the message broker.
Note: Use Redis for small or demo apps, but for larger-scale applications, you might want to use RabbitMQ since it’s feature-rich.
Backend Result:
Backend results are where Celery stores the task results after a task is executed. These results include the success or failure status to track the execution status of a task or any other metadata we need.
Backend results can be saved in any database. In this article, we’ll be using Redis, although you can use the database you already use in your application.
Since these two are necessary, make sure they’re running on your system. You can use your database as a message broker locally, but it’s hard to track and monitoring is not supported, so it’s better to use a Redis queue.
My Redis runs on port 6379, so my Redis URL will be used as both the broker and backend result URL.
REDIS_URL=redis://localhost:6379/0Installation:
Let’s install the Celery package in our Python environment using the following command:
pip install -U celeryNow, if you’re using Redis, you can directly install the package with the redis parameter to download the required necessary Redis packages as well.
pip install -U "celery[redis]"Configuration:
After successfully installing Celery, let’s create two files named config.py and tasks.py in a new folder called celery_app in the project root folder. We’ll use the config.py file to configure Celery according to our needs, and tasks.py will contain the task logic that Celery will execute when a task is given to it.
project_root/
└── celery_app/
    ├── config.py
    └── tasks.py
Now, in the configuration file, we can specify the backend and Broker URL. The basic configuration file will look something like this:
# celery_app/config.py

from celery import Celery

app = Celery(
    "tasks",
    broker="redis://localhost:6379/0", # Message Broker URL
    backend="redis://localhost:6379/0", # Backed Results URL
    include=["celery_app.tasks"],
)
Here, we’ve also included our tasks.py file to let Celery know where to find the task logic.
Note: This is just a basic configuration. We can add more settings as needed.
Task File:
Now that we have our config file ready, the next step is to write a function in the tasks.py file. This function will contain the logic that the workers need to execute. For example, let’s create a simple addition function in the task.
from .config import app

@app.task
def add(x, y):
    return x + y
Here, app is imported from the config file, and the function is given the task decorator.
Running Celery:
After configuring Celery and preparing our task logic, the next step is to run Celery. Celery needs to run in a separate process because it operates independently of the main process. Therefore, in addition to running your main application, you need to run Celery in a different terminal.
Run Celery with the following command
celery -A celery_app.config worker --loglevel=info
# Here celery_app is the folder name
This is how the result will look in the terminal.

I’ve attached the Celery task to a route, so when the route is accessed, it will send the task to Celery.
# main.py
from fastapi import FastAPI
from celery_app.tasks import add # Celery task imported
import logging

app = FastAPI()

logging.basicConfig(level=logging.INFO)
logger = logging.getLogger(__name__)

@app.on_event("startup")
async def startup_event():
    logger.info("FastAPI application starting up.")

@app.get("/")
def read_root():
    return {"Hello": "World"}

# We're sending the task to celery here
@app.post("/add")
def add_task(x: int, y: int):
    task = add.delay(x, y)
    return {"task_id": task.id}
Now that Celery is running (don’t forget to run the main application as well), let’s test it by hitting the endpoint with cURL and checking the result.
curl -X POST "http://localhost:8000/add?x=5&y=10" -H "accept: application/json"Here’s a screenshot of the above call. In a real-world scenario, Celery runs in the background, so we don’t wait to send a response. Here, I am sending back the task ID in the response.

The Celery task is executed, but to see and monitor it, we need to check Redis through the terminal. This isn’t the best approach, especially in a production environment where many tasks are executed per second. This is where Flower comes in. And no, it’s not the flower from the garden 😁
Flower
What is Flower?
Simply put, Flower is a tool for monitoring Celery tasks in real time. It’s a web-based dashboard that shows what’s happening with the tasks in Celery.
With Flower, we can inspect tasks, track workers, and see real-time execution status, whether a task failed or succeeded.
Let’s integrate Flower into our application to monitor these Celery tasks. If you’d like to learn more, please visit their documentation page.
Integrating Flower
Installation:
Install the Flower package using the following command:
pip install -U flowerRunning Flower:
The Flower package integrates well with Celery, so we don’t need to configure anything else. We just need to run the Flower command, as it uses the same configuration from Celery.
Like Celery, Flower also runs in a different process and on a different port, so make sure to run this in a separate terminal as well.
To run Flower, use the following command:
celery -A celery_app.config flowerBy default, Flower runs on port 5555. If you want to use a different port or host, you can specify them using the host and port configuration flags.
Here is what the updated command will look like:
celery -A celery_app.config flower --address=0.0.0.0 --port=5566This will run Flower, and you can view the Flower dashboard in your browser at http://localhost:5555 (or any port you’ve specified).
I’ve run three tasks using the above method, and this is how the dashboard looks.

Using Auth (Optional)
Optionally, you can add authentication to the Flower dashboard. This is useful if you host it somewhere, as authentication helps keep your dashboard secure. Flower supports different authentication methods like basic auth and OAuth. Here, let’s see how we can use basic auth, which is very simple. For more advanced authentication, check out the Flower authentication documentation.
To use Basic Auth for the Flower dashboard, simply pass the username and password to the Flower running command like this:
celery -A celery_app.config flower --basic_auth=username:passwordTo give more users access, you can add additional username and password pairs separated by commas like this:
celery -A celery_app.config flower --basic_auth=username1:password1,username2:password2Now, when you access the running port, the login will look like this:

After logging in, you can check your dashboard as usual.
Yay! Congratulations, you’ve successfully integrated Celery and Flower into your application.
I hope this article helps you learn about Celery and Flower, and how to integrate them into your Python application. Please feel free to reach out if you have any feedback, questions, or doubts. Happy coding!